26.01.19
Illustrator Script: Trim Marks with a Custom Bleed

👤 Who this is for:
Anyone who sometimes needs to create trim marks for selected objects
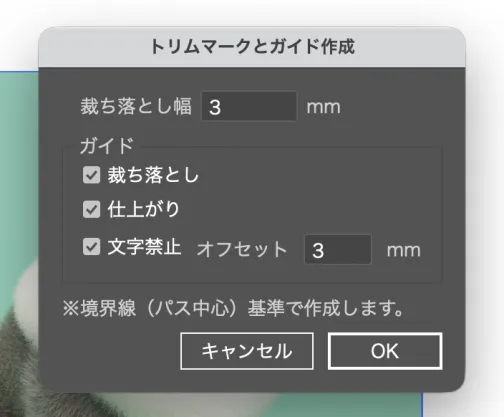
When you want trim marks as actual objects on the artboard, Illustrator’s built-in feature locks the bleed at 3 mm, right?
Setting it to anything else means tweaking everything by hand, which is a pain.
So I made a
script that creates trim marks with any bleed amount you specify.
And I threw in a few handy extras while I was at it.
✅ Features
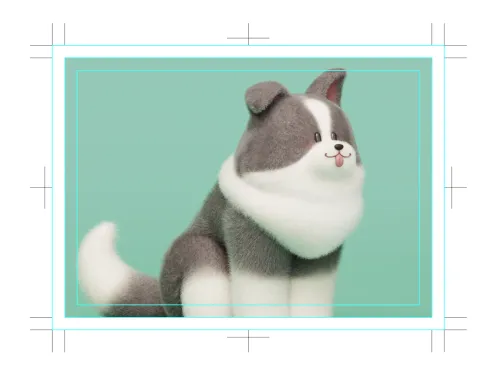
- Set any bleed amount and generate trim marks
- Generate guides at the same time (toggle on/off)
- Bleed
- Trim line
- Safe area (with a configurable offset)
✅ Smaller details
Clipping mask support
When you select an object with a clipping mask, the script uses the bounds of the mask as the basis for the trim marks.
Layer management
If layers named “Trim Marks” or “Guides” already exist, the script reuses them so layers don’t pile up. If they’re locked, it creates a new layer automatically.
Other
- Stroke weight: 0.3 pt
- Registration color is applied automatically (falls back to 100% of each CMYK channel)
- Butt caps and miter joins throughout
▶️ How to use
- Select the object you want trim marks for
- Run the script
- Enter the bleed amount and other settings
- Generate the trim marks and guides
💻 Requirements
Illustrator CC 2020 or later (tested on 2025)
*The dialog is in Japanese only.
Get it on note (note.com)
The download link and README are on →note (Japanese).

Character Design in Progress: Even a Monkey Gets Digital Stuff!

PROFILE
Konkon Warabe: Memories and a Making-Of Record

I launched a website called the TapUp Digital Glossary!